本文介绍Flink在流计算场景的简单应用,实时消费SLS内的AccessLog,并将计算结果输出到Elasticsearch。
环境
- Flink
- 1.8
- ES
- 6.3.2
假设场景
日志结构
request_time: 1556415329
uri: /analysis/path?id=1
系统AccessLog通过Logtai采集到阿里云SLS,指定request_time为日志时间字段。示例场景需求统计指定uri.path+uri.query.id分组统计访问计数。
- 实时消费
SLS日志 - 筛选
uri.path=/analysis/path(简化只统计单个path,实际场景可能是多个path的访问统计,相应的key参数规则也会不同) - 解析
uri.query参数id
创建ES索引
PUT sls_analysis

PUT sls_analysis/_mapping/_doc
{
  "properties": {
    "path": {
      "type": "text"
    },
    "key": {
      "type": "integer"
    },
    "count": {
      "type": "integer"
    },
    "timestamp": {
      "type":"long"
    }
  }
}
流程解析
接下来结合hb-chen/flink-practice源码对流程进行解析。
Gradle添加依赖
    // ES
    flinkShadowJar "org.apache.flink:flink-connector-elasticsearch6_${scalaBinaryVersion}:${flinkVersion}"

    // SLS
    flinkShadowJar "com.aliyun.openservices:flink-log-connector:0.1.7"
    flinkShadowJar "com.aliyun.openservices:aliyun-log:0.6.19"
    flinkShadowJar "com.aliyun.openservices:log-loghub-producer:0.1.8"
    flinkShadowJar "com.google.protobuf:protobuf-java:2.5.0"

    // YAML解析
    flinkShadowJar "org.yaml:snakeyaml:1.24"
参数&配置(可忽略)
虽然只是示例还是做了args参数及config.yml配置的获取,方便配置
public static void main(String[] args) throws Exception {
    final ParameterTool params = ParameterTool.fromArgs(args);
    String analysisPath = params.getRequired("path");
    String analysisQueryKey = params.get("key", "id");
    LOG.info("access log analysis path:" + analysisPath + " key:" + analysisQueryKey);

    Config config = getConfig();

    // ……
}

private static Config getConfig() {
    Constructor constructor = new Constructor(Config.class);
    org.yaml.snakeyaml.Yaml yaml = new org.yaml.snakeyaml.Yaml(constructor);

    Config config = yaml.loadAs(SlsAnalysis.class.getClassLoader().getResourceAsStream("config.yml"), Config.class);
    return config;
}
日志消费
首先参考官方文档通过SLS的各种配置创建一个Consumer,获得SLS日志流DataStream<RawLogGroupList> logStream
    // SLS消费
    // https://help.aliyun.com/document_detail/63594.html
    Properties configProps = new Properties();
    // 设置访问日志服务的域名
    configProps.put(ConfigConstants.LOG_ENDPOINT, config.getSls().getEndpoint());
    // 设置访问ak
    configProps.put(ConfigConstants.LOG_ACCESSSKEYID, config.getSls().getAk());
    configProps.put(ConfigConstants.LOG_ACCESSKEY, config.getSls().getSk());
    // 设置日志服务的project
    configProps.put(ConfigConstants.LOG_PROJECT, config.getSls().getProject());
    // 设置日志服务的Logstore
    configProps.put(ConfigConstants.LOG_LOGSTORE, config.getSls().getLogStore());
    // 设置消费日志服务起始位置
    configProps.put(ConfigConstants.LOG_CONSUMER_BEGIN_POSITION, "" + (System.currentTimeMillis() / 1000L));
    // 设置日志拉取时间间隔及每次调用拉取的日志数量
    configProps.put(ConfigConstants.LOG_FETCH_DATA_INTERVAL_MILLIS, "1000");
    configProps.put(ConfigConstants.LOG_MAX_NUMBER_PER_FETCH, "100");
    // 设置Shards发现周期
    configProps.put(ConfigConstants.LOG_SHARDS_DISCOVERY_INTERVAL_MILLIS, Consts.DEFAULT_SHARDS_DISCOVERY_INTERVAL_MILLIS);

    // 设置日志服务的消息反序列化方法
    RawLogGroupListDeserializer deserializer = new RawLogGroupListDeserializer();
    final StreamExecutionEnvironment env = StreamExecutionEnvironment.getExecutionEnvironment();
    DataStream<RawLogGroupList> logStream = env.addSource(new FlinkLogConsumer<RawLogGroupList>(deserializer, configProps));
通过RawLogGroupList结构知道logStream获得的是批量的SLS日志,单条日志是分组的RawLog列表,这就需要首先对批量的数据进行展开(flatMap())来获得单条数据流
public class RawLogGroupList implements Serializable {
    public List<RawLogGroup> rawLogGroups = new ArrayList();
}

public class RawLogGroup implements Serializable {
    public String source;
    public String topic = "";
    public Map<String, String> tags = new HashMap();
    public List<RawLog> logs = new ArrayList();
}
批量日志展开
这是整个过流程最关键的一环,这里要定义展开后数据流的结构,不啰嗦直接看结构Tuple4<AccessLogAnalysis, Integer, Long, Long>
f0:AccessLogAnalysis是解析uri的path+key的对象,也就是要用做keyBy的属性f1:Integer统计数量,单条日志全计为1(根据需求这里可以考些优化,比如Group内有序可以在range过程直接对相同request_time做聚合)f2:Long日志时间戳,考虑后续作为EventTime使用,所以将request_time转为毫秒f3:Long批量日志的最小时间戳,因为SLS日志是时间有序的,且单个RawLogGroup日志升序,所以自然的考虑使用最小时间戳作为watermark,这样也避免了arrive late的出现
    // SLS批量日志展开
    DataStream<Tuple4<AccessLogAnalysis, Integer, Long, Long>> flatStream = logStream.flatMap(new FlatMapFunction<RawLogGroupList, Tuple4<AccessLogAnalysis, Integer, Long, Long>>() {
        @Override
        public void flatMap(RawLogGroupList value, Collector<Tuple4<AccessLogAnalysis, Integer, Long, Long>> out) throws Exception {
            // Log group内时间升序,记录所有分组最小时间戳,即为watermark位置
            long minTimestamp = Long.MAX_VALUE;
            for (RawLogGroup group : value.getRawLogGroups()) {
                if (group.getLogs().size() > 0) {
                    RawLog log = group.getLogs().get(0);
                    long rt = Optional.ofNullable(log.getContents().get("request_time")).map(Long::new).orElse(Long.MAX_VALUE);
                    minTimestamp = rt < minTimestamp ? rt : minTimestamp;
                }
            }
            // 取毫秒,排除MAX_VALUE
            minTimestamp = minTimestamp == Long.MAX_VALUE ? minTimestamp : minTimestamp * 1000;

            Integer count = 0;
            for (RawLogGroup group : value.getRawLogGroups()) {
                count += group.getLogs().size();
                for (RawLog log : group.getLogs()) {
                    // URI解析
                    QueryStringDecoder decoder = new QueryStringDecoder(log.getContents().get("uri"));
                    String path = decoder.path();
                    List<String> keyList = decoder.parameters().get(analysisQueryKey);
                    if (path.equalsIgnoreCase(analysisPath) && keyList != null && keyList.size() > 0) {
                        Integer id = Optional.ofNullable(keyList.get(0)).map(Integer::new).orElse(0);
                        AccessLogAnalysis ala = new AccessLogAnalysis();
                        ala.setKey(id);
                        ala.setPath(path);

                        Long timestamp = Optional.ofNullable(log.getContents().get("request_time")).map(Long::new).orElse(0L);
                        timestamp *= 1000;

                        out.collect(new Tuple4<>(ala, 1, timestamp, minTimestamp));
                    }

                }
            }
            LOG.info("raw log count:" + count + " timestamp:" + minTimestamp);
        }
    });
EventTime & timeWindow
有了flatStream的结果,自定义EventTime以及Watermark就比较简单。.keyBy(0).timeWindow(Time.seconds(60)).sum(1)流程以f0为key分隔,60s为时间窗口对f1求和。
DataStream result = flatStream.assignTimestampsAndWatermarks(new AssignerWithPunctuatedWatermarks<Tuple4<AccessLogAnalysis, Integer, Long, Long>>() {
    @Nullable
    @Override
    public Watermark checkAndGetNextWatermark(Tuple4<AccessLogAnalysis, Integer, Long, Long> lastElement, long extractedTimestamp) {
        return lastElement.f3 <= extractedTimestamp ? new Watermark(lastElement.f3) : null;
    }

    @Override
    public long extractTimestamp(Tuple4<AccessLogAnalysis, Integer, Long, Long> element, long previousElementTimestamp) {
        if (element.f2 > 0L) {
            return element.f2;
        } else {
            return previousElementTimestamp;
        }
    }
})
.keyBy(0)
.timeWindow(Time.seconds(60))
.sum(1);
输出到ES
大致参考官方文档即可, 只是没有认证(生产环境必不可少,想到ES社区的分享,在shodan.io上找各种公开免费ES资源😏)
// Sink:Elasticsearch
List<HttpHost> httpHosts = new ArrayList<>();
httpHosts.add(new HttpHost(config.getEs().getHostname(), 9200, "http"));

// use a ElasticsearchSink.Builder to create an ElasticsearchSink
ElasticsearchSink.Builder<Tuple4<AccessLogAnalysis, Integer, Long, Long>> esSinkBuilder = new ElasticsearchSink.Builder<>(httpHosts, new ElasticsearchSinkFunction<Tuple4<AccessLogAnalysis, Integer, Long, Long>>() {
    public IndexRequest createIndexRequest(Tuple4<AccessLogAnalysis, Integer, Long, Long> element) {
        Map<String, String> json = new HashMap<>();
        json.put("path", element.f0.getPath());
        json.put("key", element.f0.getKey().toString());
        json.put("count", element.f1.toString());
        json.put("timestamp", element.f3.toString());

        return Requests.indexRequest().index("sls_analysis").type("_doc").source(json);
    }

    @Override
    public void process(Tuple4<AccessLogAnalysis, Integer, Long, Long> element, RuntimeContext runtimeContext, RequestIndexer requestIndexer) {
        requestIndexer.add(createIndexRequest(element));
    }
});

// configuration for the bulk requests; this instructs the sink to emit after every element, otherwise they would be buffered
esSinkBuilder.setBulkFlushMaxActions(1);

// provide a RestClientFactory for custom configuration on the internally created REST client
String esUsername = config.getEs().getUsername();
String esPassword = config.getEs().getPassword();
esSinkBuilder.setRestClientFactory(restClientBuilder -> {
    // restClientBuilder.setDefaultHeaders(headers);
    // restClientBuilder.setMaxRetryTimeoutMillis(...)
    // restClientBuilder.setPathPrefix(...)
    restClientBuilder.setHttpClientConfigCallback(new RestClientBuilder.HttpClientConfigCallback() {
        @Override
        public HttpAsyncClientBuilder customizeHttpClient(HttpAsyncClientBuilder httpAsyncClientBuilder) {
            CredentialsProvider credentialsProvider = new BasicCredentialsProvider();
            credentialsProvider.setCredentials(AuthScope.ANY, new UsernamePasswordCredentials(esUsername, esPassword));
            return httpAsyncClientBuilder.setDefaultCredentialsProvider(credentialsProvider);
        }
    });
});

// finally, build and add the sink to the job's pipeline
result.addSink(esSinkBuilder.build());
这里还遇到个小坑(Java丢的太久了😂),在UsernamePasswordCredentials()中直接使用config.getEs().getUsername() config.getEs().getPassword(),导致序列化错误,相关参考Apache Flink#踩过的坑
Exception in thread "main" org.apache.flink.api.common.InvalidProgramException: The implementation of the ElasticsearchSinkBase is not serializable. The object probably contains or references non serializable fields.
测试 & 打包
# 测试
$ ./gradlew sls:run --args="--path /analysis/path"

# 打包
$ ./gradlew clean sls:shadowJar
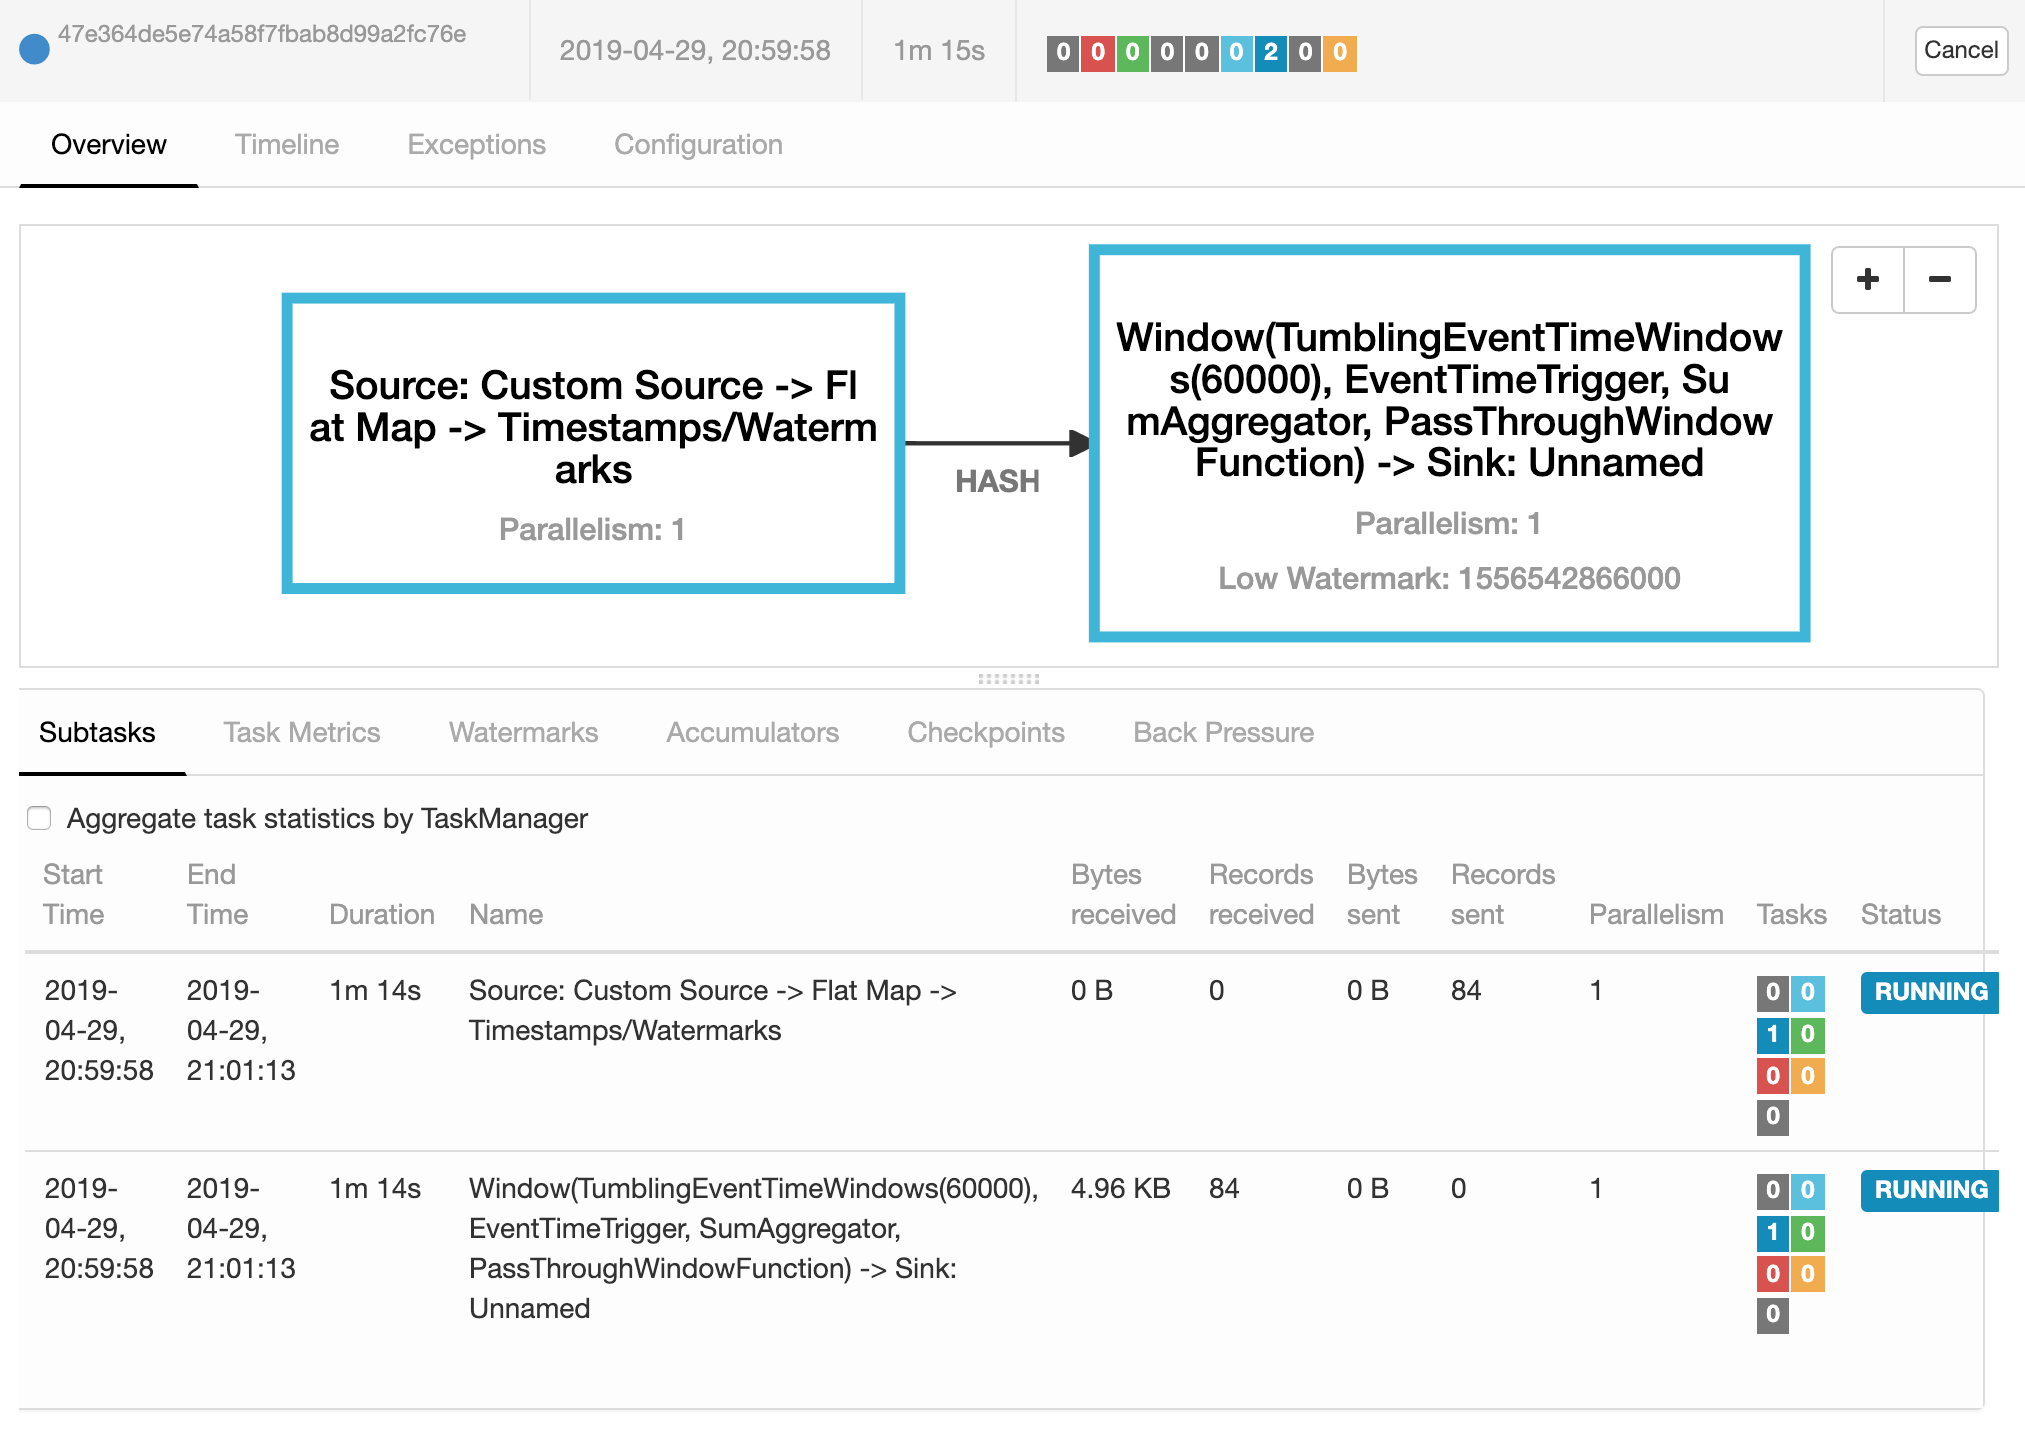
提交Job到Flink运行
上传.jar到Flink
Program Arguments
--path /analysis/path
到Kibana看下结果
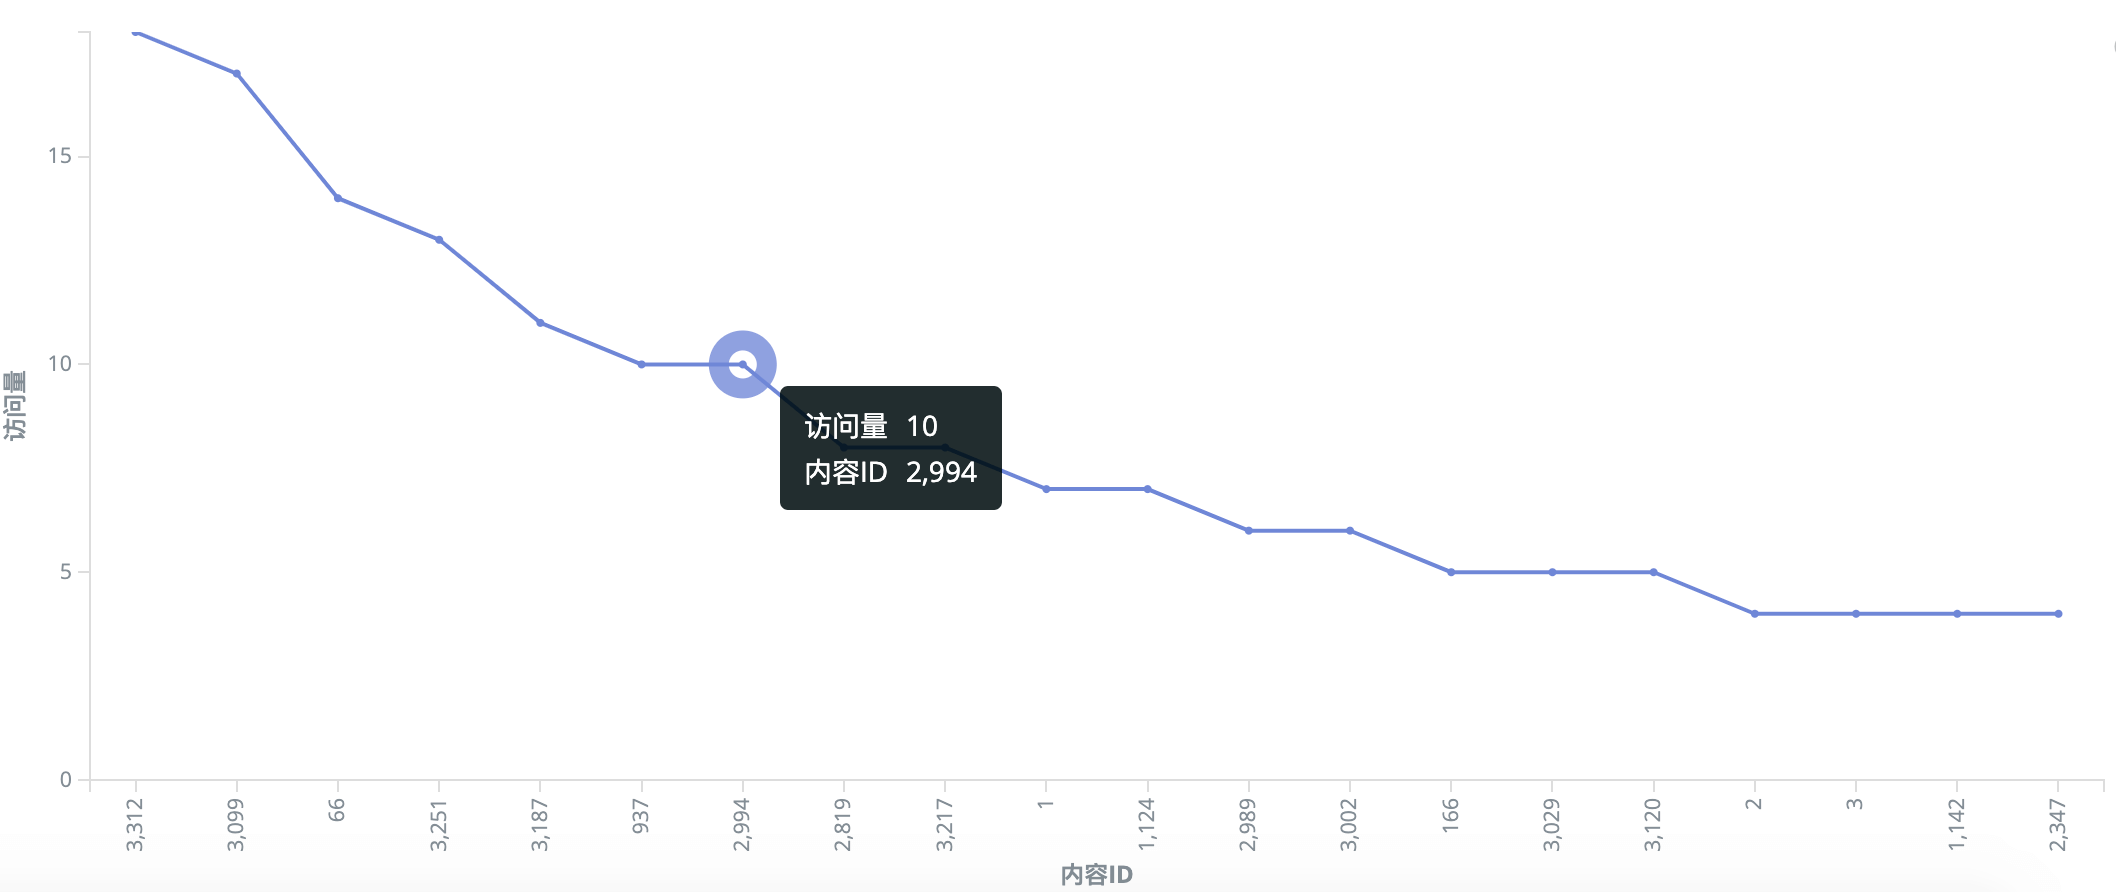
GET /sls_analysis/_search
{
  "aggs": {
    "2": {
      "terms": {
        "field": "key",
        "size": 20,
        "order": {
          "1": "desc"
        }
      },
      "aggs": {
        "1": {
          "sum": {
            "field": "count"
          }
        }
      }
    }
  },
  "size": 0,
  "_source": {
    "excludes": []
  },
  "stored_fields": [
    "*"
  ],
  "script_fields": {},
  "docvalue_fields": [],
  "query": {
    "bool": {
      "must": [
        {
          "match_all": {}
        },
        {
          "match_phrase": {
            "path": {
              "query": "/analysis/path"
            }
          }
        }
      ],
      "filter": [],
      "should": [],
      "must_not": []
    }
  }
}
TODO
- Checkpoint